
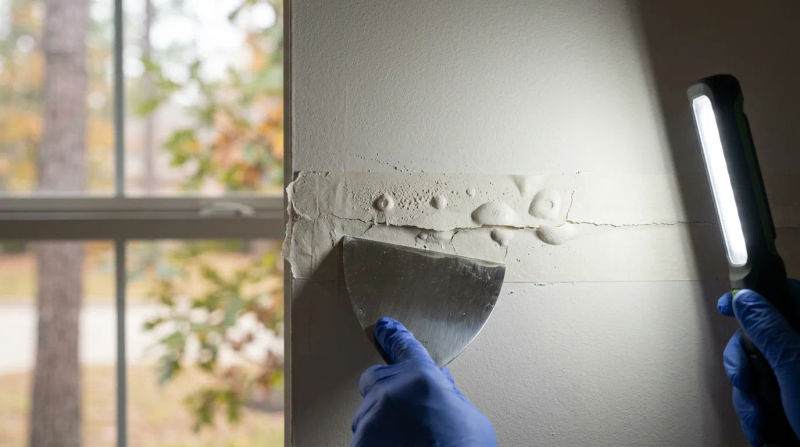
You’re getting ready for a fresh coat of paint this fall, taking advantage of the milder Shenandoah weather to tackle that interior project you’ve been planning. As you wipe down the walls in your living room, you run your hand over a seam and feel it - a distinct ridge or a soft spot that gives under pressure. It’s a bubble in the drywall tape, a subtle imperfection that, if ignored, will stand out like a sore thumb under your new paint color.
As a specialist with over a decade of experience in coatings and finishes, I’ve seen this exact scenario countless times. These seemingly minor flaws can undermine an entire painting project. Understanding what causes them and how to address them properly is the key to achieving the smooth, professional finish every homeowner desires.
Common Signs and Symptoms
Identifying issues with drywall tape is usually straightforward once you know what to look for. These problems often become most apparent when you view a wall from an angle, especially in rooms with a lot of natural light. The long, open-concept living spaces and two-story foyers common in many 1980s-era Shenandoah homes can make these imperfections particularly noticeable.
Look for these common signs:
- Visible Bubbles or Blisters: These can range from small, isolated pockets to long, continuous bubbles running the length of a seam. This is the classic sign of drywall tape bubbles.
- Raised or Prominent Seams: Instead of a flat, invisible transition between drywall sheets, you might see a raised drywall seam before painting. It can look like a long, subtle hump in the wall.
- Loose or Peeling Tape: In more advanced cases, you may be able to press on the tape and feel it move or even see the edges lifting away from the wall.
- Cracking Along the Seam: Fine, hairline cracks that follow the edge of the drywall tape are a sign that the joint compound is failing and the tape is no longer securely bonded.
These issues are frequently found in high-traffic areas like hallways or on large, expansive walls where minor structural shifts are more likely to cause stress on the seams.
What Causes This Problem
Drywall tape blistering or bubbling is almost always a symptom of an underlying issue with the installation process or environmental factors. It’s rarely a problem with the materials themselves but rather how they were applied or what they’ve been exposed to over time.
Here are the primary causes our technicians encounter:
- Insufficient Joint Compound: The most common culprit is a lack of joint compound (often called “mud”) applied beneath the tape. The paper or fiberglass tape must be fully embedded in a wet bed of mud to create a permanent bond. If there are dry spots, air gets trapped, and a bubble is almost inevitable.
- Air Pockets: Even with enough mud, air can be trapped under the tape if it isn't smoothed out properly with a drywall knife. An experienced professional uses firm, consistent pressure to squeeze out all excess compound and air, ensuring the tape lies perfectly flat.
- Moisture Intrusion: Drywall and joint compound are highly susceptible to moisture. A past roof leak, a plumbing issue in the wall, or even consistently high indoor humidity can re-wet the joint compound, causing it to soften and release its bond with the tape. This is a critical factor to investigate before attempting any drywall tape blistering repair.
- House Settling and Movement: Homes in the Shenandoah area, particularly those built in the 1980s, have had decades to settle. This natural structural movement, though often microscopic, places stress on the rigid joints between drywall panels. Over time, this stress can be enough to pop a seam or cause the tape to buckle.
- Painting Too Soon: Applying primer or paint over joint compound that hasn't fully cured can trap moisture within the wall system. As that moisture tries to escape, it can push the tape away from the surface, leading to blisters.
When to Call a Professional
Many homeowners wonder, “how to fix drywall tape bubbles on my own?” While a very small, isolated bubble might be a manageable DIY project, most situations benefit from professional expertise to ensure the repair is truly invisible.
Consider handling it yourself if:
- The bubble is very small (less than 6 inches long).
- It is in a low-visibility area, like inside a closet.
- You have experience with drywall work and are confident you can cut out the old tape, re-apply compound, feather the edges, sand smoothly, and prime correctly.
However, we strongly recommend calling an experienced professional if you encounter any of the following:
- Widespread Bubbling: If you see bubbles on multiple seams or in several rooms, it could indicate a systemic installation issue or a larger moisture problem that needs expert diagnosis.
- Long, Continuous Bubbles: Repairing a long seam requires skill to create a perfectly flat, level surface. A poorly done patch can result in a visible hump or valley that looks worse than the original bubble.
- Bubbles at Corners: Inside or outside corners are complex and require special tools and techniques to repair correctly.
- Signs of Moisture: If the drywall feels damp, is discolored, or shows any signs of water damage, a professional should assess the source of the moisture before any cosmetic repair is attempted.
- You Demand a Perfect Finish: The most compelling reason to hire a pro is the quality of the final result. Our trained crews have standardized processes for these repairs. We ensure the patch is feathered out perfectly, sanded flawlessly, and properly primed so that after the final coat of paint is applied, the repair is completely undetectable.
Here in October, the milder weather provides ideal conditions for these interior repairs. It allows for proper ventilation to manage dust and help the compound and primer cure effectively without putting a heavy load on your HVAC system.
Conclusion
Drywall tape bubbles and raised seams are more than just minor cosmetic annoyances; they are signs that the foundation of your wall finish is compromised. Simply painting over them will only highlight the imperfection. The key is to address the root cause, whether it’s poor initial workmanship, moisture, or the natural settling of your home.
By correctly diagnosing the issue and performing a durable, seamless repair, you ensure that your investment in a fresh coat of paint delivers the beautiful, lasting results you expect. Don't let a small bubble today become a major eyesore tomorrow. Addressing it properly before you paint is one of the most important steps in any interior painting project.
If you notice any of these signs on your walls, contact a local painting professional for an inspection. They can assess the extent of the problem and recommend the best course of action.